Apple Tree Sewing Patterns is a fantastic Canadian pattern designer. She focuses mainly on “grow with me” style patterns and I believe I have every pattern she has released. This new pattern, I had the privilege of testing and I couldn’t be more happy to share it with you here!
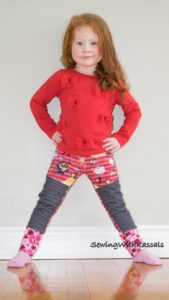
The Grow Along Pants feature double knee patches which is super exciting! One thing about grow with me clothing is that since they last for years (0-12 months, 1-3 years, 3-6 years) kids tend to wear them out before they outgrow them. Which is fantastic BUT now, with the Grow Along Pants the knees are doubled giving them extra life! I made all 3 pairs with double, stretch denim knees. I got the stretch denim from Water Tower Textiles Canada. I also made them all with faux moto patch stitching, I will go into exactly how I did that later on in this post. I like the 3D look it gives plus the kids love that their knee patches feel bumpy. 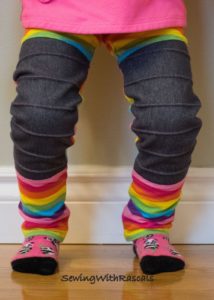
Both my girls fit in the middle size, the 1-3 years. My youngest wears 24 month ready to wear clothing here in Canada and my older girl wears 3T. The oldest even has some growing room still! The fit is incredible, it’s designed to be a tighter fitting pant, so it will be somewhat loose on the younger sizes (see below) and somewhat tight on the end of the size range. The picture above is my older daughter, who wears 3T and below is my younger IN THE SAME PAIR and she’s in 24 month sizes. Isn’t this incredible!? This particular pair I made with the reversible option, you can see in the photo below the rainbow print from the side in the photo above is rolled up on the bottom of her legs. 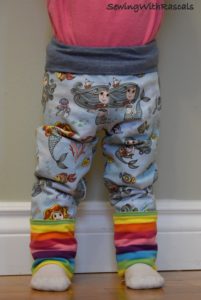
The pattern prints separate so you can print just your chosen size. It is drafted well, the paper pattern fits together nicely as well as the cut fabric pieces when assembling the pants. The pattern was well tested by a wide range of shapes and sizes. As I mentioned above you can make them fully lined/reversible or you can make them a single layer with fold over leg cuffs. There are also options to add the moto patch or just leave them as plain leggings with only an inside seam. You can view the pattern and the different options the testers sewed up on the pattern listing in the Etsy Shop.
I do really love the fit of these pants, and also all the options included. The lined option is, obviously, more time consuming but the outcome is so worth it and you can use two prints for a really fun look. I made a lined/reversible pair for my son and used a thinner distressed knit so I lined them with a bamboo french terry (all those fabrics I got from Water Tower Textiles Canada). One thing I noted from this was, having a much stretchier fabric paired with a less stretchy fabric makes them a bit tricky to get on. If I was selling these I would be sure to make them out of fabrics with the same stretch.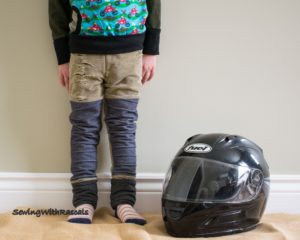
Now to the moto patches! Here is how I made mine:
Your going to want to use the SAME stretch fabric for your patches. I opted for stretch denim and just made the two layers out of the same fabric. I used denim because of it’s durability. I didn’t find that it made the knees too thick, even on the single layer pair that I made from the Beauty and the Beast cotton spandex print.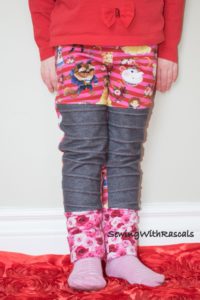
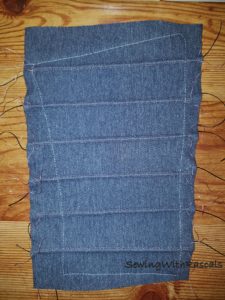
I cut two mirror images with the pattern piece, then I cut two mirror images of the basic shape of the pattern piece, but a bit larger, see the photo below. You want one for each knee that is larger than the pattern piece because this method will make the patch shrink some since it pulls the fabric up into “tunnels”.
I marked lines at 1″ intervals with chalk through both of the larger patch pieces.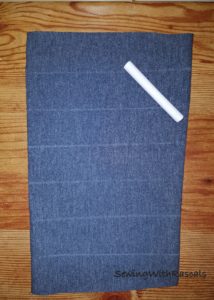
Then using a 4.0/75 stretch twin needle (you can see the one I used here), and turning up my thread tension to double what it normally is, (note: you may need to test this on a scrap to see what tension to turn your specific machine to, but on mine I normally have my thread tension around 3 so I turned it up to a 6 and found that worked perfectly) then I simply sewed along the chalk lines I drew. Some additional things to note here, I use Maxi-lock Stretch thread in my bobbin whenever I use my twin needle, which I find makes stitching much easier and stretchier. I also ensured that I stretched each stitched row out so that when the patch is sewn onto the pants there would be no chance for threads to pop from the rows being too tight.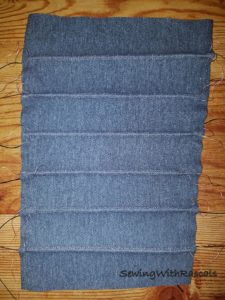
Next I laid the exact cut patches on the ones I had sewn. Sewn patch will be on the outside of the pants, unsewn will be on the inside, you can lay them together however you wish as long as you make sure the right side of the sewn patches are on the outside of the pants. I pinned them together and basted them (use a long stitch. I use the longest one on my machine, and sew close to the edge, as in the first photo below) so they were easier to sew later on. Once basted I cut off the excess from the outside patch so the whole patch looks like pattern piece (photo below shows piece before the excess has been cut). Then you sew as instructed in the pattern!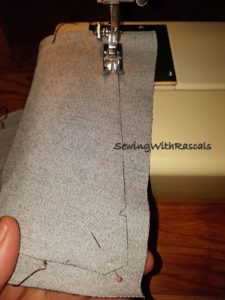
This method takes more time than simply sewing lines on the top of your patches but I really love the look and the added texture.
If you don’t like the longer patches you can also read the Apple Tree Sewing blog for a tutorial on how to shorten them. Personally I like them longer because to me, the more space they cover the better!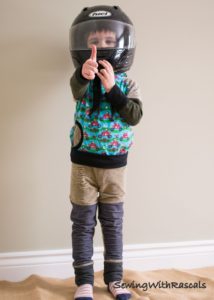
Grab this pattern and get sewing those prints you have been keeping for that special something! Since these last so long your child will get to enjoy that favourite print for longer. Check out Water Tower Textiles Canada for great quality fabrics, including stretch denim for those knee patches!